Concrete

The Versatility of Concrete Stamping

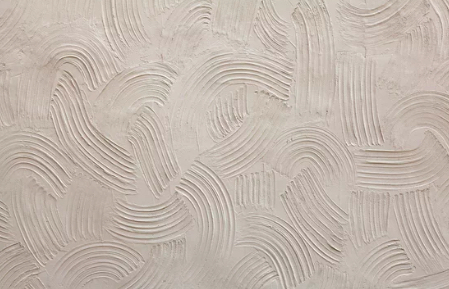
Stamped Concrete Colorado Springs is a versatile method of coloring and textured finishing concrete that can mimic the look of stone, slate, brick, or wood. Walttools offers a wide range of concrete coloring and stamping products.

While stamped concrete is an aesthetically pleasing material, it is not typically recommended for do-it-yourselfers. The high expertise required makes this a job best left to professionals.

Concrete is a versatile building material, and when it’s colored, stamped, or designed in a certain way, it can be used for many different purposes. For example, it can look like pavers or natural stone. This can give your home a luxurious appearance. It can also be used as a floor or wall cladding. It can be complemented with other materials like wood or tiles to create an appealing and unique design. It can even be poured into different shapes. This allows you to have a custom-designed space matching your existing landscaping and house.

Another advantage of stamped concrete is that it is less expensive than pavers or natural stone. It is also easier to install and maintain. Additionally, it is durable enough to withstand the elements and heavy traffic. It can be installed in residential properties, commercial spaces, and public areas. This makes it a great choice for homeowners, business owners, and developers.

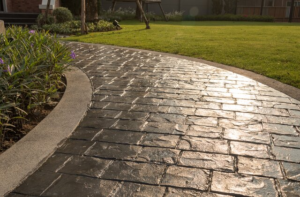
It can mimic the look of other materials, including natural stone, brick, and cobblestones. It can be molded to look old-world European, or it can be made to resemble travertine or antique cobblestones. Depending on the look you want, it can be matched to your existing landscaping or contrasted for a dramatic effect.

Stamped concrete is versatile because it can be colored using various techniques. It can be colored during mixing or stained after the concrete is poured. In addition, it can be colored using a powder or a spray-on color release. This makes it easy to customize the color and pattern of your concrete. This is unlike other natural or manufactured products, which often have limited color options. Working with a professional who knows how to apply the color release properly is important. This will ensure that the color is evenly distributed and will not fade or chip. This will help the concrete last longer and look better. Regular maintenance, such as cleaning and resealing, will keep the concrete looking new.

Whether used as a replacement for asphalt, pavers, or existing concrete, the durability of stamped concrete is unmatched. When poured correctly, this concrete can last for decades without cracking or chipping. It is also resistant to weather elements and the sun’s rays so that it will retain its color for longer than other paving materials. This durability makes it a good choice for various applications, including patios, driveways, pool decks, and interior floors.

One of the best things about stamped concrete is that it’s very easy to maintain. It only requires regular sweeping and occasional hosing down with water. It’s also important to avoid deicing agents on the concrete, as they can damage or stain it.

While stamped concrete is very durable, it’s still not immune to damage. If your concrete is damaged, it’s important to contact a professional to repair it. A skilled professional can use various methods to improve the concrete, such as patching or grinding it down and then resealing it.

Hiring a professional contractor to install stamped concrete is a good idea for the best results. They can help you choose the right stamps and colors and ensure the concrete is properly poured. In addition, a professional can offer helpful advice on how to care for your new stamped concrete.

To maintain the beauty of your stamped concrete, it’s a good idea to reseal it every two or three years. A good sealant will protect the concrete from water, stains, and weathering, keeping it looking new for longer. It’s also important to sweep regularly and hose down the surface with water to prevent dirt buildup.

Stamped concrete is a great option for homeowners who want to upgrade their outdoor space. It’s durable and versatile and can be customized to suit your style. It’s also less expensive than pavers and other paving materials. Just make sure to follow these tips to ensure a successful project.

Concrete is a very sturdy material that can be used to create a variety of textures and finishes. This versatility makes it ideal for outdoor applications, including patios, walkways, and driveways. It’s also cost-effective compared to other decorative materials like stone or timber. Unlike natural materials, which can be susceptible to damage from frost and abrasions, stamped concrete is durable and hard-wearing. It’s also non-porous, meaning it won’t absorb moss or other plant growth.

The durability of stamped concrete means that it requires minimal maintenance. It can be easily cleaned by sweeping or washing regularly with a garden hose and detergent solution. This will help to prevent dirt buildup that could shorten its lifespan. Similarly, periodic resealing will help to protect the surface from weathering and staining.

Remember that stamped concrete is more likely to crack if used to create a heavily-used area, such as a driveway. This is because the weight of vehicles can cause stress on the surface that wouldn’t normally occur in other areas, such as a patio. This is why it’s important to ensure that the proper level of reinforcement is included when having your concrete constructed, especially if it will be used for this purpose.

Another potential drawback to stamped concrete is that it can be difficult to repair. This is particularly the case if the stamping process needs to be carried out correctly or if there are issues with the quality of the aggregates used in the concrete. While this was a common problem in the past, improvements in stamping and aggregates have made it less of an issue nowadays.

It’s also worth noting that stamped concrete can become discolored over time, mainly due to exposure to UV rays. This can be addressed by resealing, but installing shade structures over the area is a good idea to help prevent this. Talk to a professional if you need help maintaining your stamped concrete. They’ll be able to advise you on the best products and techniques for keeping your concrete looking its best.

Decorative concrete can mimic the look of various building materials, including flagstone, slate, tile, brick, and wood. This means you can easily create a floor, patio, pool deck, or driveway perfect for your home or business. The versatility of stamped concrete also makes it easy to create a floor that matches the style and color of other elements in your outdoor space.

There are different ways to stamp concrete, each with advantages and disadvantages. The most common method is to use a precast slab that has been cured and cut to the appropriate size. This is then affixed to the site using fasteners and screws. The slab can then be imprinted with a pattern of your choice. Another option is to pour the concrete and use a “stamper” to create the desired pattern. The advantage of this method is that it allows for more precise detailing than other methods.

In addition to being versatile, stamped concrete is a great way to add an element of luxury to your home or business without breaking the bank. It’s less expensive than other natural materials and can be used to replicate the look of more costly materials such as stone or brick.

The choice of pattern and color is up to the individual, but some things should be kept in mind. First, it’s important to choose a style that fits in with the space’s overall aesthetic. For example, select a concrete stamp replicating this material if your home is stucco. When choosing a stamp design, it’s also important to consider the surrounding landscape.

If you have a lot of greenery in your yard, choose a concrete stamp replicating the look of wood or slate to complement the natural environment. Lastly, choosing the right color for your stamped concrete is important. Some different coloring options are available for stamped concrete, including integral coloring, acid staining, and dyes.

Stucco

Factors That Affect the Stucco Cost of Your House

Many factors go into the stucco cost of your house. Some of these factors include: the size of your home, the texture, and your location. If your walls are taller than 14 feet, scaffolding will be needed, which will add to the price. You may also need a building permit.

Materials

stucco

Stucco Charleston SC comes in a variety of materials. The base and finishing coats can be made of cement, acrylic, or fiberglass, and they can be reinforced with mesh. The costs vary depending on the material, as well as other factors, such as the size of your home and whether you want a colored finish. The average cost for a stucco house ranges from $5 to $6 per square foot. This doesn’t include the cost of labor or building permits. The amount of work required to install the stucco also affects the price, as does the need for scaffolding.

The stucco construction process begins with the base coat, which is typically made of Portland cement mixed with sand. This layer is designed to protect the substrate material from rough weather conditions and absorb water in case of flooding or leaks. The base coat is usually applied in a 3-coat system, which also includes a foam layer.

Once the base coat has been cured, the final layer can be applied. The final coat is a mixture of one part cement and 1 1/2 to 3 parts sand, and it may contain pigment for color. It is troweled and float onto the wall, and it’s recommended that the coat be allowed to dry completely before painting (if desired).

In addition to being beautiful, stucco provides insulation and helps reduce sound transmission, which can be helpful for homeowners who live near busy roads. It can also improve a home’s energy efficiency, allowing it to stay cool without using as much energy. However, it can be more difficult to maintain than other sidings, and it’s important to check for cracks regularly. Cracks can be caused by several things, including changes in temperature and humidity, leaking pipes, foundation shifts, and incompatible repairs.

While stucco is a popular choice for exterior walls, it’s not the best option for every house. It requires a lot of energy to make, and it’s not as durable as brick. It can also be less eco-friendly, as it uses natural materials and must be transported long distances. It can also be brittle and is not suitable for certain regions, and it can be damaged by heavy winds.

Labor

Stucco is a long-lasting and durable building material that requires specialized skills and knowledge to install properly. It can add a natural, earthy essence to homes of all styles, and it can be applied to many different types of surfaces including brick, wood frames, concrete, or steel. It can also be painted and textured to suit any style. However, stucco can be more expensive than other siding options because it takes more time to do and the labor involved is higher.

The first step in determining how much it will cost to stucco your home is assessing the condition of your existing plaster or masonry finish. If it is in poor condition, the prep work included in the project will increase your total cost. It is also important to consider how long you want your stucco project to take, especially if it will be a new installation or a re-coat of your current finish. Weather can significantly affect the timeline for your project, and may even delay it if necessary precautions are not taken due to COVID-19.

There are several different types of stucco available, and the costs will vary depending on the materials used. Traditional stucco, for example, is made of cement, lime, and sand, and is typically applied in three coats over a lath base that includes water-resistant paper and wire mesh or fiberglass. It can be more expensive than other types of stucco, but it is very durable and better at keeping moisture out of a home.

Other types of stucco are more lightweight and easier to install, but still offer a high-quality look. EIFS, for instance, is the latest development in stucco and is a very durable option. It is a combination of many thin layers over foam insulation and is designed to resist moisture, making it an excellent choice for areas with harsh climates.

Although stucco does a good job of repelling moisture, it can become saturated with rainwater and cause problems in the building structure. These include lintel and window frame settlement; wood lath rot; moisture migration through the building envelope; and rising damp. These problems can be avoided by ensuring that the stucco is well-installed and maintained, and by protecting it from direct sunlight.

Scaffolding

The cost to stucco a house depends on the size of the surface and the type of finish you desire. The price per square foot includes the cost of the materials and labor. The average cost is around $5 to $6 per square foot for cement stucco and $10 to $12 per square foot for acrylic or mesh. It is also important to consider any preparations that might be needed for the job. For example, if the building designs include extremely high walls, scaffolding may be required to work on them. This will increase the total costs of the project.

Stucco can be a practical and beautiful choice for homeowners who want to renovate their homes. However, it is important to know the limitations and disadvantages of this material. For example, it can be prone to water infiltration and is not recommended for all climates. Additionally, it requires more frequent upkeep to patch holes and cracks. Additionally, it is porous, and substances such as tree sap can discolor it over time.

A new form of stucco, called Synthetic, is becoming more popular and is usable in more climates. It is more flexible, thinner, and more durable than traditional stucco. In addition, it can be used in conjunction with insulation to provide additional energy efficiency.

Before stucco can be applied, the framing must be protected from moisture damage. This can be accomplished with a waterproof barrier such as asphalt-saturated paper or one of a variety of manufactured plastic-based sheets known as stucco wraps. These barriers must protect the wood framing from rain and other weather elements while allowing water vapor to escape.

Another protective measure is to install a Driwall rain screen over the WRB. This is a sponge-like layer that is placed over the wall to absorb moisture, which it then channels down through the weep screed and out into the drainage system.

The final step is to install E-Z Beads, which create flexible strip seals along windows and doors. These are a vital part of the watertight system. They help keep water from entering the frame and causing rot or mold.

Tabby shell

Before bricks and concrete, tabby shell was the go-to construction material for many structures in Beaufort and the surrounding coastal areas. It’s made of a simple mix of lime (cooking whole oyster shells in a kiln to create quicklime), sand and water mixed with burnt oyster shells. The resulting mixture was used like a concrete to build walls, foundations and other structures throughout the Lowcountry region. The recipe was simple and readily available because oyster shells were plentiful along the shore and Native American “middens” – prehistoric heaps of discarded shells – provided the lime needed for the process.

While it was an arduous building technique, early settlers quickly adopted it because they found it cost-effective and less time-consuming than bricks. It was also easy to work, as it could be molded into forms to create walls and other structural components. And it was durable enough to stand up to the stormy, hurricane-prone southeastern coast.

Today, the look of traditional tabby concrete can be emulated with a modern mix that includes crushed oyster shells, water and Portland cement. The result is a lightweight, versatile material that can be colored to create a variety of design options. We’ve used it in modern pool decks and driveways, for example, adding a pop of color that looks great against greenery.

The most authentic examples of historical tabby can be found in ruins scattered across North Florida and the southeastern coastline. They include plantation houses and other commercial buildings, as well as many historic forts. Some have been restored to showcase their architectural significance, while others have simply worn away, revealing the raw oyster concrete underneath. These skeletons offer a rare opportunity to explore the building methods of an early age. Their raw, rustic beauty recalls the Japanese aesthetic of wabi-sabi.

While the use of true tabby has diminished, it continues to be a popular choice for hardscape in Southwest Florida. It’s a beautiful way to bring a distinctive Charleston style into your landscape design. The light gray concrete stays cool on hot days and the crushed oyster shells add a unique texture and visual appeal to your project.

Construction Services

What You Should Know About a Marine Contractor

Most property owners on the water will require services from Your Marine Contractor at one time or another. Careful selection of the right contractor for the job can make all the difference in results.

Marine Contractor

Marine construction encompasses many diverse projects, including coastal erosion control structures, bulkheads, seawalls, groins, and jetties. The equipment involved requires specialized ocean marine insurance coverages not usually provided by dry land contractors.

Marine contractors build important infrastructure in the maritime industry, including marinas, port facilities, shipyards, bridges and causeways, docks, piers, wharves, bulkheads, and cruise terminals. They must be able to handle the unique and complex environmental factors that accompany these structures. In addition, they must comply with rapidly changing regulations at all levels of government, either general or linked to specific maritime activities.

To ensure that your project is done properly, choose a contractor who has a solid track record. Look for companies that have consistently completed projects on time and within budget. Ideally, they will also have experience working in the specific area of your project. A marine contractor who is experienced in constructing coastal projects may be able to save you money and avoid costly mistakes that can lead to expensive delays and unanticipated expenses.

The choice of materials and construction techniques is critical for marine projects. Ask potential marine contractors about their selection process and what they have learned from past projects. This will help you understand their rationale and may give you insight into how they can meet your needs. It is also a good idea to ask them about any unusual problems they encountered on previous projects and whether the owners were satisfied with the results.

Working on or near water poses many more hazards than working on land. Marine contractors are at risk of being swept off their feet by waves, tide action and powerful currents. They must also operate large machinery on workboats that sway with the movement of the waterway, making it difficult to control their movements and putting them at increased risk of injury or death.

When selecting a marine contractor, be sure to evaluate their financial stability. Companies that are unable to manage their finances may be forced to cut corners on safety, maintenance and insurance to make ends meet. This type of short-term thinking can compromise the quality of your project and leave you with unforeseen costs later on. Be sure to look for a company with stable and experienced leadership and strong business ethics.

Certifications

In order to perform marine construction work, you must be licensed by the state. You can find out more about the licensing process by contacting the contractor licensing bureau in your area. Getting licensed is an important step in the process of becoming a Marine Contractor, as it will help you find employment and work in your chosen field.

A Marine Contractor is a tradesman who installs, alters, repairs, or relocates the supporting members of docks and piers. This includes piles or pilings, columns, posts, and stanchions. This scope of work also includes the dredging and filling of waterways, and the construction of sea walls. A person who is licensed as a Marine Contractor can be employed in the execution of these tasks or may direct employees of his/her company to perform them.

The highest maritime certification that a person can obtain is the Master’s license, which allows him/her to manage other specialists and crews. To obtain this advanced degree, you must pass training and get sufficient sea time. This is the most important requirement in any maritime career and might become even more stringent with new STCW rules.

Getting licensed as a marine contractor involves three steps: applying for an entity license, paying a study manual/test fee and passing the exams. After passing the exams, you will be licensed to perform marine contractor services for a period of two years. You must submit proof of continuing education to the MCLB when you renew your license.

In addition to having the proper credentials, you must carry insurance as a marine contractor. This includes workers’ compensation and general liability insurance. This is essential in the event that a claim against you occurs. It will protect your company from financial ruin if a lawsuit is filed against you by an employee or another party.

Lastly, you must keep the MCLB apprised of any changes in contact information or the representative on your marine contractor’s license. This should be done within 5 days of the change. You must also take the Florida Marine Contractor Exams every other year to keep your license active.

Insurance

Marine contractors are exposed to major perils that can shutter their business and sink profits. It is important to have customized insurance to protect against these losses. A marine contractor’s insurance program can include coverage for equipment with waterborne coverage, commercial hull and protection and indemnity (P&I), builder’s risk, and business interruption.

These policies provide protection for the physical damage to a vessel, its cargo and its hull caused by an insured peril such as fire, collision, explosion or vandalism. These policies also provide for salvage, a term that refers to the act of saving or rescuing a ship that is in distress at sea. It is a legal concept that stems from the principle of good seamanship, where sailors are honour-bound to assist vessels in distress. This is a very important part of marine insurance, as it allows for the recovery of costs to save a sinking vessel and its cargo.

It is vital for marine contractors to have adequate commercial general liability coverage to cover claims against them for bodily injury, property damage and personal/advertising injury related to the work they perform on the water. It is a unique exposure and most regular commercial general liability policies exclude coverage for marine activities.

Another type of insurance coverage a marine contractor may need is inland marine coverage. This provides coverage for materials and equipment that are in transit between projects or while awaiting delivery from vendors. It can also protect the marine contractor’s tools and supplies from theft.

A marine contractor can also need workers’ compensation and general business liability coverage. Both of these policies provide protection for employees hired by the marine contractor and others who are working on a project. They can also provide payment for medical expenses and lost wages due to an injury.

It is important for marine contractors to work with an agent that has experience in this field and understands the risks involved. The right agent will help the marine contractor get a policy that is appropriate for their business needs and protects them against the most common losses.

Safety

A marine contractor must take several safety measures to protect their workers and the people around them. These steps include ensuring a safe work environment, implementing safety protocols, and holding crew members accountable for their actions. Additionally, they must ensure their equipment is properly inspected and maintained.

Marine construction projects present unique safety challenges that many other construction professionals do not face. For example, the water can create slippery surfaces and cause slips and falls. It can also pose a threat to pedestrians who walk near worksites. Additionally, this construction niche is prone to weather conditions, such as storms and high winds, that can interfere with the work process and cause safety risks.

To prevent these safety issues, a marine contractor should have a safety manager who oversees the formal safety program and conducts regular training sessions. These sessions can discuss new rules, regulations, and procedures, as well as provide practice exercises to prepare the crew for potential emergency situations. In addition, a marine contractor should also have a designated place to store safety reports, inspections, and training materials. This allows crew members to easily access important information and keep track of all safety protocols.

In addition to these safety protocols, a marine contractor should have a system in place for monitoring employee performance. This system should be accessible to all employees and allow them to view real-time data on their individual performance. This will allow the company to quickly identify any issues and address them immediately.

Moreover, a marine contractor should have a comprehensive safety program that covers all aspects of the business. This includes a detailed safety policy, emergency response plans, and risk assessment and mitigation strategies. The safety program should be documented and communicated to all employees, and supervisors should be held accountable for their role in implementing the policies.

In addition to these safety initiatives, marine contractor should have dedicated insurance to protect their assets and business. This coverage can help them recover from losses caused by natural disasters, accidents, or other unforeseen perils that could halt a project or sink profits.

Electrical Services

Electrical Components in Construction

Electrical in construction involves the design, installation, and maintenance of electrical systems in commercial buildings. These systems are also used in industrial, institutional, and residential structures.

Electrical workers are at risk for injuries due to improper use of tools and equipment, faulty wiring, and other common hazards. Training helps reduce these risks and improves worker safety. Click https://www.epicelectrical.com/ to learn more.

electricians

Electrical work on construction sites presents unique hazards not found in general industry. These risks can result in serious injury or death to workers involved. Those working in the industry must understand and control these hazards to protect themselves and others from harm and fulfill their legal obligations.

Electrical systems on construction sites must comply with the requirements of AS/NZS 3012 – Electrical installations — Construction and demolition site wiring. This includes the distribution system from the power supply service connections to receptacle outlets.

Conductors must be run as multiconductor cords or cable assemblies in raceways. If not subject to physical damage, they can also be un-insulated open conductors on insulators not more than 10 feet (3.05 m) apart. Either way, the cables and cords must be protected from accidental damage. Cords and cables must be kept from sharp corners, projections, or edges and should not pass through doorways where they might become a hazard to people using the doors.

Splices on cords and nonmetallic cables must be made according to approved methods. The ends of spliced conductors must be taped over. Splices must be marked with the words ” ‘ construction wiring”. Cords and nonmetallic cables must be positioned to avoid crossing roadways or access paths used by cranes, trucks, and other heavy machinery. If they must be placed in such a way, they must be marked with iridescent yellow tape at intervals no more than five meters apart.

All fifteen and twenty-ampere, single-phase receptacle outlets on construction sites that are not part of the permanent wiring of the building structure shall be grounded effectively using ground fault circuit interrupters or an assured equipment grounding conductor program. This will protect personnel in the event of an energized surface.

Electrical systems are vital to any project, but in construction, they can only be in place for a limited time. Temporary wiring systems are designed to provide power for lighting, tools, and machinery while work is underway. These systems can also provide emergency power if the primary system fails.

Temporary systems can be installed using various wires and other devices. The most common is copper wire, which has a high conductivity and is inexpensive. Aluminum and multiconductor cords are also commonly used in temporary systems. These systems must be carefully guarded to prevent access by unqualified personnel. Fencing, barriers, or other means should be used to prevent unauthorized persons from contacting the equipment.

During the construction process, temporary wiring must be properly supported to keep it out of the way of workers. This can be done with cable trays, hoists, or ceiling suspensions. The supports must be able to withstand the weight of the cables and be capable of supporting the load. The trays and hoists should also be marked to identify them as hazards and must be secured to protect the worker from injury.

The NEC requires that temporary installations have a limit on their duration. Article 590 outlines these limitations and specifies that the installation must be removed at the end of the construction period. This may seem like a relaxation of safety standards, but the Code is still clear that all the requirements for permanent installations still apply to temporary ones.

For example, a builder can run NM-B cabling without height limitations in locations that would normally require raceway or metal sheathed cable type wiring methods for a permanent installation (590.4(C)), and boxes are not necessary for most splices of cords and nonmetallic cable on construction sites (590.4(G)). Nevertheless, the AHJ must approve these methods based on location and application.

The switchboard is the centerpiece of your electrical system. It houses switches, circuit breakers, and fuses, which are used to control, protect, and isolate sections of the power distribution in buildings and other facilities. It also contains busbars, a series of aluminum or copper strips that transmit power from cable conductors to devices within the switchboard.

While the switchboard can look intimidating and complex, its functionality is simple. Firstly, it receives power from the main electricity supply and then distributes it to other areas of your facility. The power is channeled into smaller circuits, which send the electricity to individual devices. Each device can use the full power or draw less from the circuit.

It is also important to remember that the switchboard must have an RCD (Residual Current Device) installed. This is because it is designed to detect any electricity leaking from the system. It is intended to stop any person from being electrocuted by disconnecting the power immediately.

In terms of construction, the switchboard is a large single panel or frame that can be used to house molded case circuit breakers and fuses, air circuit breakers with a drawout function, transformers, and other electrical control and protection gadgets. It is a key safety component for any building and is usually located at the service entrance of a structure.

This ensures the switchboard is readily accessible and allows for easy replacement of faulty equipment and circuit breakers. It should also withstand any force that could be applied to it, including from flexible cords/extension leads. The switchboard must also be effectively protected against damage, and any openings that may expose live parts of the system should have covers.

Circuit breakers protect the wiring in a building from overcurrent, which can cause fire hazards. They work similarly to fuses, cutting off the current when it climbs above a safe level. This process is known as “tripping” and prevents damage to the wiring and other electrical systems in a building. They can also interrupt the power flow to certain building areas for maintenance or repairs.

A circuit breaker has two contacts: a major pair of copper or silver alloy and an arcing or auxiliary pair that stays connected during normal operation. The major contacts are designed to open & close without harming each other, while the arcing pair carries only a small amount of current. If the arcing or auxiliary pair is broken, the current will increase, which means that the circuit has an overload. The circuit breaker will then interrupt the current by opening its major contacts.

The arcing caused by the separated contact is extremely hot & dangerous. The circuit breaker can use several techniques to extinguish or “quench” the arc, including cooling, compressing, and replacing the ionized air with fresh gas.

There are many circuit breakers, ranging from devices that protect low-current appliances to large switchgear that can defend the high-voltage circuits that feed an entire city. Some are specialized for different functions, such as RCCB or residual current circuit breaker that protects against line-to-ground fault current and MCB or miniature circuit breaker that offers protection against overloading and short circuits. Others are combined with other safety functions, such as RCBO or residual current with overcurrent breakers that offer RCCB and MCB functions in one device.

Overhead distribution lines (power lines) carry electric energy over long distances. They consist of bare conductors strung between towers and supported by insulators. Overhead power lines are the lowest-cost method of transmission for large amounts of electricity. They are also the least susceptible to damage from snow, ice, and lightning. However, they must be adequately clear of the ground and other structures for safety reasons. In some cases, overhead power lines are upgraded to increase their current handling capacity, which increases the voltage on the line.

Overhead power lines are often used for distribution substations and feeders, which distribute electricity to consumers. They are usually constructed along public right-of-ways, although higher-voltage bulk transmission lines can be built in a private right-of-way.

The feeders receive electricity from the high-voltage transmission lines at a substation. They then transmit that energy through distribution transformers to a series of feeder lines that connect to customers customers’ premises. Distribution substations increase the voltage of incoming power lines for long-distance transmission and then decrease them again for distribution. They also serve as the junction point for multiple power lines heading to different areas of a community.

Insulators are essential to operating overhead power lines since they protect the conductors from touching each other. The insulators must be capable of withstanding the high voltages involved in the transmission and distribution of electrical energy, as well as resisting forces resulting from wind and lightning strikes.

The insulators may be made of wood, steel, or aluminum (either lattice-type or tubular), concrete, or reinforced plastics. They are typically designed to be as safe as possible, particularly for workers who need to maintain them. For example, some insulators have a semi-conductive glaze that allows a small amount of current to pass through them to warm the surface and reduce the accumulation of dirt, fog, and other contaminants.